haskell-cairo-tutorial-0
I’ve started off going through Benjamin Kovac’s Generating artwork with Haskell and ended up with trying to master the Cairo API.
One of the things I like the most about Haskell (among so many other things) and it’s related libraries is any project ends up as a game no different than playing with Lego. Everything you do ends up as an activity of making sure the different pieces fit each other. And of course Haskell is always a blessing to work with.
Now into the thick of it. What I plan to do is to give a brief intro to the idea behind cairo but won’t expand beyond what is already given in the official tutorial and follow that up with some direct code port from the mentioned official tutorial link to Haskell and throw in my mix of things.
Warning and Gintama Disclaimer:
I’m just an idiot goofing about with Cairo and Haskell and this write-up is just me writing down my results of experiments with Cairo and Haskell. This is definitely not a Pro-written tutorial
I am not the creator of the Gintoki images used in this tutorial, nor the creator of Gintoki nor Gintama. I have used these images just to showcase image transformations with the same.
Cairo: Basic Rundown
Cairo operates on three layers i.e
- The final destination (the layer that will contain the final result)
- The Mask (or the blueprint)
- The Source (the ink that get’s pressed through the mask)
Note: I have yet to understand what sort of advantage this sort of abstraction gives anyone. As of now it’s just a novel idea to me, though other than that it has nothing going for itself. This may change in the future.
First steps with Haskell and Cairo
Let’s attempt to do draw a rectangle on a white surface, the code is pretty straightforward (imo of course), here it is in all it’s glory and hopefully the comments direct it (Hopefully you have stack set up, a new project with cairo as a dependency and keep this hackage link open in a tab for reference, API docs help alot pals and gals)
import Graphics.Rendering.Cairo


outputFileName :: String
outputFileName = "output1.png"


drawRectangle :: Render ()
drawRectangle = do
                  setSourceRGB 0.0 0.0 0.0    -- set the source layer to black color
                  setLineWidth 5              -- set virtual pen width
                  rectangle 10 10 100 200     -- draw a rectangle at (10,10)
                  stroke                      -- transfer to mask


main :: IO ()
main = do
         surface <- createImageSurface FormatARGB32 400 400
         renderWith surface drawRectangle   -- stamp source though mask to final destination
         surfaceWriteToPNG surface outputFileName
And the output is as follows

(cairo-output)
Now just for fun let’s take the following image and add a red rectangle somewhere on it
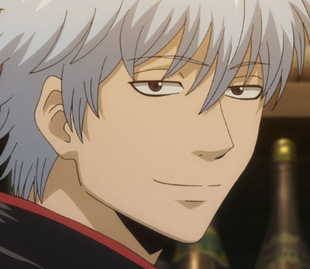
(gintoki-picture)
import Graphics.Rendering.Cairo


outputFileName :: String
outputFileName = "output2.png"


gintokiFileName :: String
gintokiFileName = "gintoki.png"


drawRectangle :: Render ()
drawRectangle = do
                  setSourceRGB 1.0 0.0 0.0    -- set the source layer to red color
                  setLineWidth 10             -- set virtual pen width
                  rectangle 50 50 100 100     -- draw a rectangle at (50,50)
                  stroke                      -- transfer to mask


main :: IO ()
main = do
         surface <- imageSurfaceCreateFromPNG gintokiFileName  -- this  line is the major difference from the previous code
         renderWith surface drawRectangle                      -- stamp source though mask to final destination
         surfaceWriteToPNG surface outputFileName
And the output is here
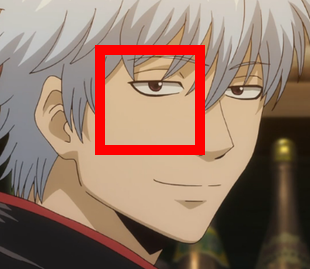
(cairo-output-2)
Bypassing the mask layer
There seems to be a way to completely transfer the source to the final destination without going through the mask mumbo-jumbo. Below is a port from the official tutorial code to Haskell which happens to be an example of bypassing the mask layer.
import Graphics.Rendering.Cairo


outputFileName :: String
outputFileName = "output4.png"


gintokiFileName :: String
gintokiFileName = "gintoki.png"


transferSource :: Render ()
transferSource = do
                   setSourceRGB 0.0 1.0 0.8    -- set the source layer to some color
                   paintWithAlpha 0.5


main :: IO ()
main = do
 surface <- imageSurfaceCreateFromPNG gintokiFileName
 renderWith surface transferSource
 surfaceWriteToPNG surface outputFileName
and the output for the above is

(cairo-output-3)
Boring yeah? let’s try doing the exact same thing but to the Gintoki Picture
import Graphics.Rendering.Cairo


outputFileName :: String
outputFileName = "output4.png"


gintokiFileName :: String
gintokiFileName = "gintoki.png"


transferSource :: Render ()
transferSource = do
                   setSourceRGB 0.0 1.0 0.8    -- set the source layer to some color
                   paintWithAlpha 0.5


main :: IO ()
main = do
         surface <- imageSurfaceCreateFromPNG gintokiFileName
         renderWith surface transferSource
         surfaceWriteToPNG surface outputFileName
The output:

(cairo-output-4)
Now let’s try something even more interesting! Let’s fuse two images!!!!! So now all this time we’ve been using a solid color as a source. Let’s switch to using a picture and do the exact same bypassing the mask + added transparency with a picture to a picture. It’s a cairo miracle (heehee jokes.. albeit of the non-funny kind)
The second image is a second picture of Gintoki (and the destination surface still remains the first picture of Gintoki)

(gintoki-picture)
import Graphics.Rendering.Cairo


outputFileName :: String
outputFileName = "output4.png"


gintokiFileName :: String
gintokiFileName = "gintoki.png"


gintoki2FileName :: String
gintoki2FileName = "gintoki.png"


transferImage :: String -> Render ()
transferImage fileName = do
                           surface <- liftIO . imageSurfaceCreateFromPNG $ fileName
                           setSourceSurface surface 0 0   -- set a source to a surface rather than a colour
                           paintWithAlpha 0.5


main :: IO ()
main = do
         surface <- imageSurfaceCreateFromPNG gintokiFileName
         renderWith surface (transferImage gintoki2FileName)
         surfaceWriteToPNG surface outputFileName
and the output is
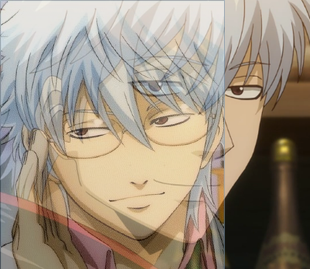
(cairo-output-5)
I believe the confusion that could possibly arise from the last example is the random use of liftIO, that just there to give a sense for more complicated things to come
Render is a monad and is a member of typeclass MonadIO and implements the liftIO function which has a type signature liftIO :: IO a -> Render a.
That’s all for now folks, tune in next time for gradients stuff and hopefully much more than that